I am frequently asked by developers who have never put their hands on systems and networking: where does the code go when deploying? how is an application hosted on a server?
In this article I will be creating a dedicated hosting space on a cloud platform onto which I will host a simple ASP.NET demo using Docker. In a future article I will write about hosting your own application from Visual Studio and how to make the application scalable and highly available but for now, I will keep things simple as an introduction.
So stay tuned for my upcoming articles!
1. Creating the server
Whether you have in-house hardware with VMware setup or using a mainstream Cloud Hosting like Google Cloud or Azure, if you want to host your code and prepare it for scaling, the best way to do it is by creating a dedicated server with allocated resources. By this I mean creating a virtual machine somewhere with some ram, CPU and storage, then install an operating system on it and connect it to the internet with a static public IP address. If you manage to do this, congratulations, you’ve basically created a ‘Cloud Hosting’!
For my example, I will be using Azure for creating a dedicated hosting space, but the process to follow is pretty much the same on any other platform, even if you’re running your own hardware and virtualisation software at work. The first step, is creating a new virtual machine, and in my case; from the Azure dashboard I will create a new Linux virtual machine.

1.1 Resources
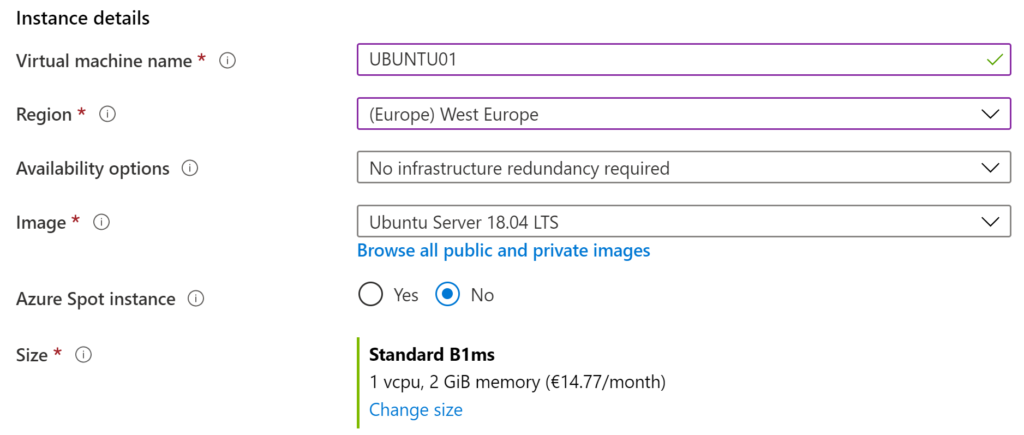
In the next step, some resources need to be allocated and of course, the more resources you allocate, the more you pay and therefore the right balance needs to be considered when creating virtual machines. For my project’s requirement I will go with 1 vCPU and 2 GB Ram which for a Linux system this is more than enough. Ubuntu Server is my favourite Linux OS to work with but all other Linux variations are pretty similar if you’re still learning.

1.2. Remote Access
The next step is defining how you’d access this machine remotely from your working or personal computer. When working with Linux Server the best tool for access in my opinion is Putty, with this tool you can create a public/private SSH key pairs using a sister tool called PuttyGen and use these for setting up an SSH access to the virtual machine.
Of course if you’re working on dedicated VM software, you will instead install the Ubuntu Linux manually from an ISO image and then create your authentication as part of the installation process. Nevertheless, Putty can still be used to access the virtual machine with normal username and password in this case. Look up creating public and private keys with Putty and PuttyGen if you’re not familiar with this and then place the public key in Azure and private key in your Putty application.
1.3 Storage
Standard HDD is pretty cheap and works well enough for my exercise but consider SSD storage when planning a system with high IOPS such as database machines.
1.4 Networking
As the for networking configuration, a huge convenience of using online cloud platforms like Google Cloud and Azure is that you get most of the networking configuration done automatically. When working with a dedicated VMware setup however, you will need to make sure to assign a private IP to the machine from your subnet pool and make sure to add the IP to your firewall.
A public IP when will need to be assigned with a NAT rule on the firewall to associate the private IP of your virtual machine with a public IP which is reachable externally from the internet over HTTP. Make sure that inbound HTTP and HTTPS ports are open for this public IP on the firewall and hence port 80 and 443. Also port 22 needs to be open if you want to connect through Putty later on. In this case, on Azure when you hit create you’ll automatically get assigned a private and public IP to the host machine and can be found in the dashboard.
2. Setting up the server
Now that the machine is created and associated to a public IP, we can use Putty to connect through SSH and start setting up the server. If you’re not used to working with strict command line interface, don’t worry, it doesn’t take much to get used to it and trust me, when it comes to Linux it’s way better to learn using the command line rather than the GUI. However if you really want a GUI, you can lookup how to install the GUI on Ubuntu and then use a tool like X2Go to access it remotely.
The first thing to do when accessing a Linux machine the first time is run the update command so that then you can start installing some tools.
$ sudo apt-get update2.1 Install Docker
At this point, since we’ve created a hosted server and have access to it, we could simply install a web server like NginX or Apache, copy our code on the web server’s directory and run our website through the public IP on port 80 and it would just work fine. Well.. if you had a very simple application with just HTML and CSS it would work perfectly well.
Of course, when you build more complex applications with C#, Java and Angular etc, you need to also install the respective frameworks and libraries top make things work and 99% of the times you run into issues which you didn’t have on your developing machine. For this reason, I will take a bit of a longer path setting up my server by installing Docker but trust me, it will pay off later on when we start hosting applications.
If you’re not familiar with Docker or don’t fully understand what it does, there is a LOT of documentation and videos online that describe it but in my words, Docker is a platform which allows you to run individual applications and services on your web server and takes care of allocating resources to each application accordingly and makes sure to install all of it’s dependencies and external frameworks for you. It’s also a good framework to help you automise deployment processes and setup CI-CD pipelines (more on this in my next articles).
The easiest way to install Docker, is to download the shell script from their portal and run it on your server, this will save up a few commands. You will need CURL to download the shell script file, if you’re not familiar with CURL don’t worry, you can follow my commands below in order to get Docker installed.
NOTE: you need to change <your-user> with your actual root username (which you login to Ubuntu with).
$ sudo apt-get install curl
$ curl -fsSL https://get.docker.com -o get-docker.sh
$ sudo sh get-docker.sh
$ sudo usermod -aG docker <your-user>
2.2 Create a demo
Now that Docker has been installed, we can make a quick test for an application. Apart from being good at packaging your own code into applications, Docker has also a library of applications and services which can be downloaded and installed with a simple command. There happens to exist a Web Hello World application among others and we can run a few commands to download this application and then run a docker command to make it run on a web server on port 8080 so that we can test that our server is working properly.
$ sudo docker pull tutum/hello-world
$ sudo docker run -d -p 8080:80 --name mydemo tutum/hello-world
To make sure it’s running you can use the following command to list all working processes:
$ sudo docker psYou should get something of the sort:

At this point, you can try to access this application using the public IP address which Azure allocated to the machine (or on your firewall) and running in a browser as follows:
http://<your_public_ip:8080/
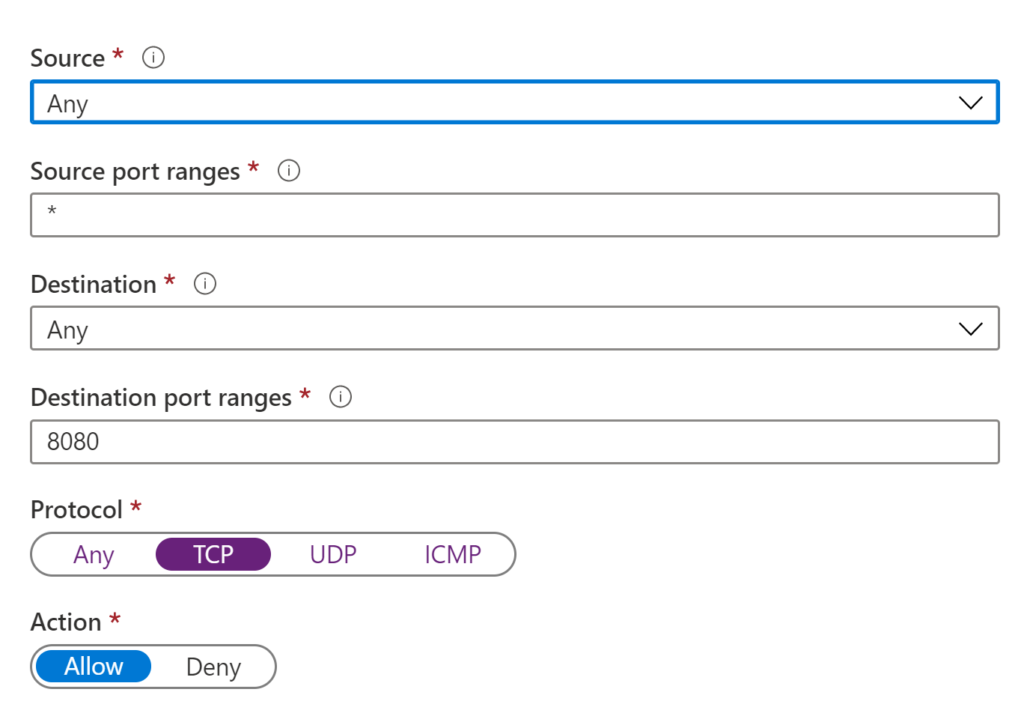
Note that if you’re getting a timeout form the browser, the 8080 port might to be allowed from the firewall. In my case since I’m using Azure, I went to Networking settings on the dashboard and enabled the inbound access as shown below.

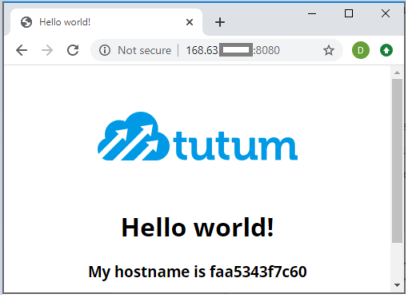
Finally you should be able to reveal the demo web application project as follows.

Conclusion
In this article I went through some explanation on how to create your own dedicated hosting space with networking and host a simple application on it. I also introduced Docker a a powerful platform which can be used to simplify deploying new applications and services on your server.
In my next articles I will talk about building your own application and use Docker to containerise it and host it on your server. I will briefly explain how you can make a basic automatic deployment and continuous integration (CI-CD) pipeline so that you can continuously deploy updates of your application.
In a later article I will explain how an application can be made scalable and highly available so that when new updates are being deployed you have zero downtime.
Stay tuned for more!
References
1.Docker web demo container
https://hub.docker.com/r/tutum/hello-world/
2. Installing Docker on Ubuntu
https://docs.docker.com/engine/install/ubuntu/